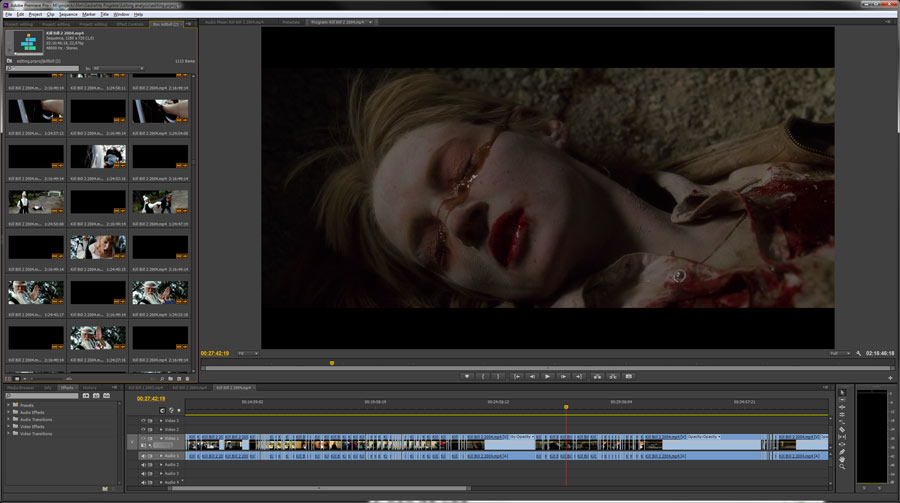
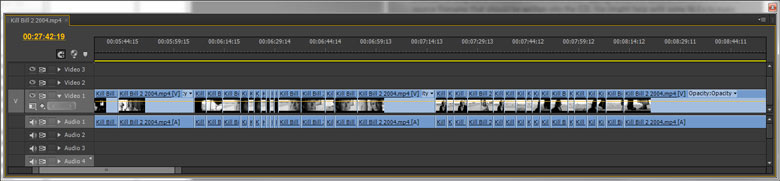
I like to study films in an NLE like Premiere. You can see the rhythm of the scenes a lot clearer when you look at clips in the timeline. Like this:
Unfortunately it used to be very tedious to go through a scene (let alone a whole film) and set all the cuts again by hand. Until now. Today I created a workflow to automate edit detection for use in an NLE. All you have to do is run two tools and you get an EDL that you can import into your NLE of choice, link the media and off you go. The whole process takes maybe 15 minutes for a feature length movie.
You need to touch the command line for two commands, but stay with me, it's really simple. The hard part, the actual scene detection in the movie file, is done by the wonderful ffmpeg program, more specifically the ffprobe program. It takes a video file and creates a spreadsheet file with the times of the edit points it detected.
The second part is creating an EDL from this spreadsheet file. I wrote a little tool for this today that you can download below. It is written in C# as a console application, is release as GPL code and hosted on bitbucket if you want to compile it yourself or modify it. It should work as is on Windows and on OSX and linux if you install Mono.
If you want to use it, here is a step by step guide.
- Download ffmpeg from their website. Either put the bin directory in your path or if you don't know how to do that then put ffprobe.exe into the directory where your movie is.
- Open a command line and go to the folder where the movie file is (start->cmd.exe on windows)
-
Run this command and replace MOVIEFILENAME with the name of your movie file. It shouldn't contain any spaces. Be sure to copy the command exactly as stated here:
ffprobe -show_frames -of compact=p=0 -f lavfi "movie=MOVIEFILENAME,select=gt(scene\,.4)" > MOVIEFILENAME.csv -
This will take a while and output a bit of status information. The ".4" is the scene detection level between 0.0 and 1.0, lower numbers create more edits, higher numbers create less edits. 0.4 should be a good default.
-
Download EDLGenerator.exe and run it, again from the command line, like so:
EDLGenerator.exe MOVIENAME.csv FRAMERATE MOVIENAME MOVIENAME.edl
The first file is the csv file you generated earlier, FRAMERATE is the framerate of the movie (needed for dropframe timecode corrections when appropriate), the second MOVIENAME is the source filename that should be written into the EDL file (might help with some NLEs to make linking easier) and the last is the name of the edl file to generate - Import the edl file into your NLE (In premiere in File->Import)
- Link the media (in Premiere CS6 you can select all clips in the bin and choose link to media and just have to select the source file once even though premiere creates one source item for each edit)
- Voilla, you are done!
I have only used it on a couple of movies so far so there may be some rough edges - if you run into a problem, drop me a line.