As the 5D mark II can still only record in 30 fps because there is no firmware update to record in more useful 25 fps (for pal DVD/TV) or 24 fps (for cinema projection), the need to retime footage from 30 fps to 25 fps definitely still exists. There are many methods to do this, but many are not as high quality as one would like. In this blog post I will explain what methods exists for retiming exist, what they look like and in the next follow up post I will show how to do high quality retiming in After Effects.
First, an overview of the problem: Your camera records in 30 frames per second (fps). You get the stuff into your editing software of choice, set the timeline to 30 fps and edit you film. You export your final film and up to here, everything is fine. But now you need a Pal DVD (to be played in Europe) or a film copy to screen in cinemas (lucky bastard). So now you have the problem of how to go from 30 fps to 25 or 24 fps.
If you had shot a silent film, you could simply play it back a little slower. A hypothetical 5 second film at 30 fps could be played at 25 fps and now be 6 seconds long. Everything would move a little slower, but maybe that could be cool. Unfortunately, if you try this with a film that uses audio, the sound would have to be slowed down as well and thus be significantly lower in pitch.
Since most films nowadays want to use sound, this leaves us with 3 options that slow down the images while maintaining the same duration and thus keep the audio unchanged.
- Frame dropping
- Frame blending
- Frame generation (aka Optical Flow Analysis, Pixel Motion, Motion Vectors)
All following samples will use PALs 25 fps, the same methods can of course be used to go to 24 fps, just the numbers are slightly different. The sample videos linked to below are all the same clip of some location scouting footage that I edited specifically so that one could study the effects of different retiming methods. Here is the original clip at 30 fps (29.97 to be exact because I converted it to cineform via NeoScene)
Frame dropping
The first option is frame dropping. It simply removes every 6th frame. Our 5 second clip from before would still be 5 seconds long, but of the original 150 frames, 25 would have been dropped. Here is a little graphic I made to illustrate what happens.In this example we see 6 frames at 30 fps that need to become 5 frames at 25 fps (so that at both frame rates, the clip would play in exactly 1/5th of a second or 0.2 seconds).

Frame dropping leads to a strange jerky sensation that can be seen here. Some people are more sensitive to this than others:
Advantages of this method
- It works consistently
- It renders very quickly
- No problems with hard cuts
Disadvantages of this method
- Looks very strange
Frame blending
Frame blending always blends two frames together. So the first frame A of our new 25 fps sequence is a blending of frame A and B in the original sequence; the next frame is constructed from B and C and so forth (the exact details how and which frames are blended can vary). Here is an illustration of what happens:
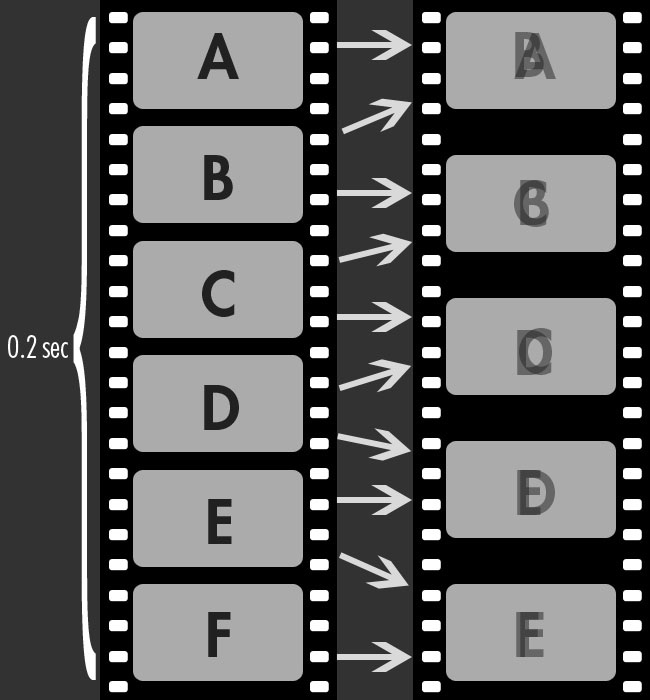
In this graphics this looks pretty bizarre, but since most individual frames of a film look very much alike, this usually works pretty well. It gets more noticeable when there are quick movements, especially when the scene was filmed with a short shutter time and the objects have little motion blur. Here is a frame where the blending can be seen very well:

The good thing about frame blending is that it looks relatively pleasant most of the time and it works in any case. One of the problems with it is that it will soften your hard cuts. Here is an example where what used to be a hard cut from this frame

To this one

Gets turned into this blended frame

Here is the sample clip with frame blending.
In after effects one can protect hard cuts (see this post for more information on how to do this). The resulting sample can be seen here:
Advantages of frame blending
- It is more pleasant to watch than frame dropping
- It renders quickly
- Most of the time it looks ok
- It works consistently
Disadvantages
- Extra care needs to be taken to protect hard cuts
- Noticeable "double exposure" effect
Frame generation
Frame generation is a process that goes by a myriad of names (aka Optical Flow Analysis, Pixel Motion, Motion Vectors, ...). The principle is always the same though: a clever algorithm tries to understand where similar groups of pixels move in the image and calculates in between frames by moving the pixel groups further than they used to move, an extra 1/6th of the original distance to be precise (in this particular case). The upside is that if it works, the image looks perfect and no matter how much movement is in a frame, there will never be the "double exposure" effect seen with frame blending. The downside is that even though these algorithms have gotten very good, sometimes they get badly messed up and produce something like this:
![]()
This happens basically at every hard cut, so you have to protect your hard cuts against this problem (see this post for more information on how to do this). However, it can even happen when there are no cuts, e.g. when the lighting changes dramatically (see this blog post for an image where that happened). If that happens, tweaking the parameters can often help, but sometimes you will have to resort to frame blending for a couple of frames where frame generation simply does not work.
Here is an example with pixel motion where hard cuts are unprotected (this sample uses twixtor instead of After Effects, but the results in this case are very much alike):
And here with hard cuts are protected (native After Effects again):
See the bottom of this post for some more clips retimed with the Twixtor plugin.
Advantages
- If it works, the quality is very good
Disadvantages
- Extra care needs to be taken to protect hard cuts
- Can sometimes produce messed up frames, output has to be carefully watched and problems eliminated
- Longer rendertimes
My advice would be to go with frame blending if are in a hurry, and use frame generation if you have time to check and maybe fix the output and want very high quality. In both cases you should remember to protect your hard cuts – something that to my knowledge can only be done in compositing programs like After Effects. If you have the option to use Twixtor, I can highly recommend it as it seems both more stable and significantly faster than TimeWarp. Details on how to use After Effects for retiming can be found in my next blog post.
For the sake of completeness, here are 3 samples of the result when using Twixtor with frame blending and frame generation:
Twixtor frame blending, hard cuts not protected
Twixtor frame blending, hard cuts protected
Twixtor frame generation, hard cuts protected